John, from Pepe Custom Paint was gracious enough to give us some insight into how Craig’s masks are designed and painted. Wondering how someone gets into painting NHL masks? John gives us this insight:
“I studied art in college, hoping to get into commercial art and illustration. While taking a break from school I got a job working for a large hockey equipment manufacturer. One day at work I heard that they were looking for someone to paint goalie masks and although I had very limited airbrush experience at time I was able to land the gig. At first on a part time basis and later as a full time artist working for myself. I have been painting professionally for about 20 years.”
For more info on Pepe Custom Paint, hit up their facebook page.
For all you wondering how Craig’s masks get their beautiful design and polish, keep reading as John describes the process:
The right side of the mask already more or less done. The base (background) color still remains white as I like to work from light to dark. A lot of people paint their masks with the final base color and work from there but I do things a bit backwards. I paint all my masks white before I do anything else.
The left side of the mask ready to go.
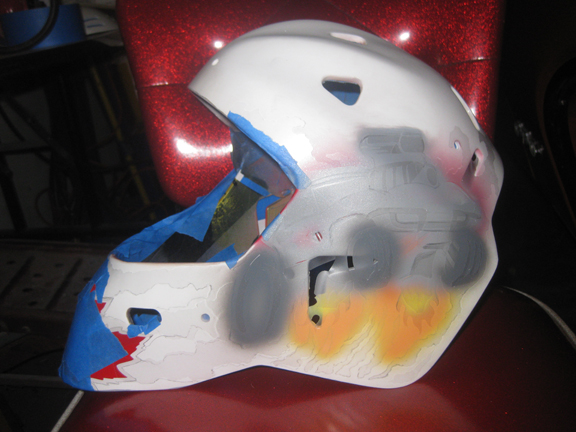
With a pencil I map out where the elements of the design will be located. The car is relatively easy to work in as the areas cut out by the vents don’t make a huge difference in identifying this as a Corvette. The leaf that is carried over from the right side of the mask is taped to protect it from overspray.
I begin to mask off the areas that I want to remain white.
The colors begin to be sprayed out. I am not concerned about overspray as the light areas are already masked. As long as the paint goes where I need it to be I am fine with it.
More of the same. My paint method, at least for a design like this, is a lot like painting an Easter egg. Keep masking what you want to keep paint off of as you go progressively darker.
Paint starts to go down on the Centurion. Unlike the Corvette, this part takes a lot more planning. He has to be positioned in such a way as to avoid having his eyes, nose or mouth cut out by vent holes or covered up by straps. It’s takes a little practice and sometimes some trial and error is needed to get it right.
Time to paint in the background. Leaves are done in random sizes and in three different colors to give a little depth.
Right side unmasked.
Left side unmasked. Detailing will make all the difference here.
I begin with the Centurion and the smoke. I decided to go in a different direction with the art this time. I wanted to get away from the “airbrushy” look. Instead I wanted to lean more towards the lowbrow style. I was going for an Ed Roth meets Robert Crumb look or something to that effect.
Now the Corvette gets the same treatment.
Done and clear coated.
Finished product.


